Find the different tutorials of the various ALEO mining pools to join a right ALEO mining pool and start mining ALEO.
Since the Aleo project officially opened the testnet incentives on December 2, more and more people are gradually turning their attention to it. As the launch of the Aleo mainnet is getting closer, many people are very concerned about how to earn more points in the early participation and redeem more aleo tokens.
On December 7th, the official Aleo team also said, “Because proofs are inherently competitive, we recommend that smaller provers create/join proof pools to make it easier.”
As you can see from the official discord, a prover pools channel has been specially established. The Aleo mining pool in the market mainly includes f2pool, Hpool, ZK.work, Hamp, Zkrush, Aleopool, Damo, etc.
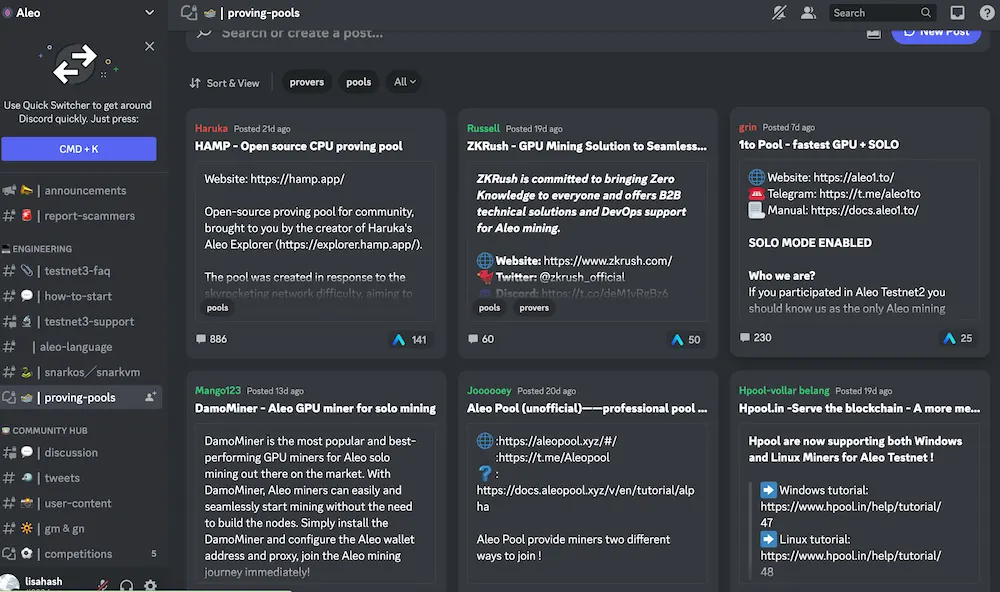
The following are the tutorials of the various ALEO mining pools.
Mine ALEO on F2pool
ALEO Mining rewards will be settled daily as credits, according to the payout scheme of PPLNS, and then accrue in your f2pool account. Adding of wallets and reward withdrawals are currently not supported, f2pool will send payouts according to Aleo’s follow-up post about the details of the incentives.
Please kindly note that, in order to receive incentivized testnet rewards, KYC process is required after launching the mainnet. If f2pool cannot pass through KYC by the Aleo project team, they will not be eligible to receive rewards from the network and thus cannot distribute them to you. Also, they will restrict our services to the regions that are under Aleo official restriction.
Aleo can be efficiently mined with NVIDIA GPUs. For each GPU, you may get the following ready:
GPU: NVIDIA GPU with driver version 515 or above.
CPU: 8-core CPU
Memory: 8 GB
SSD storage: 128 GB
You need to get the Ubuntu 18.04-20.04 (version for servers, without GUI) operation system ready, and install this mining software (download).
Read More: Aleo Mining Hardware: How to Build Aleo Mining Rig
You will need to create an f2pool account before mining Aleo on its testnet 3. If you do not have one yet, please click here to register.
Setting an account name will be required for configuration. You are free to create multiple subaccounts to monitor your mining machines.
You may choose one of the following ways to configure the mining software.
If you choose to connect to non-SSL server:
1) Set the account name:
Open the config.cfg file, find ACCOUNT_NAME=accountname, and replace the accountname with your f2pool account name.
2) Add pool URL:
In the config.cfg file, replace the second line with POOL="aleo-asia.f2pool.com:4400"
3) Run the software:
Copy the files of aleo_setup.sh, aleo-prover-cuda, and config.cfg into the same folder on your mining machine.
At the first time of mining, run the following command to generate the scripts of start_aleo.sh and stop_aleo.sh:
sudo ./aleo_setup.sh
Check out if it is running properly using this command:
ps aux |grep aleo
In 3 minutes, the result will be successful if it shows similar as the following example.
2022-12-09 00:19:41.041 INFO 2.1.2 474322 perf: 870059 (1m: 1319.02 P/s, 5m: 1317.87 P/s, 30m: --- P/s, 60m: --- P/s)
2022-12-09 00:20:41.042 INFO 2.1.2 474322 perf: 949274 (1m: 1320.25 P/s, 5m: 1318.25 P/s, 30m: --- P/s, 60m: --- P/s)
2022-12-09 00:21:41.043 INFO 2.1.2 474322 perf: 1028496 (1m: 1320.37 P/s, 5m: 1319.03 P/s, 30m: --- P/s, 60m: --- P/s)
2022-12-09 00:22:41.044 INFO 2.1.2 474322 perf: 1107681 (1m: 1319.75 P/s, 5m: 1319.43 P/s, 30m: --- P/s, 60m: --- P/s)
Then you may run the following command to start mining, This will run automatically at startup from the next time.
./start_aleo.sh
To pause mining, run the following command:
./stop_aleo.sh
If you choose to connect to SSL server:
1) Install stunnel
a. Run the following command line on Ubuntu:
sudo apt-get install stunnel4
b. Configure in stunnel:
cat <<EOF | sudo tee /etc/stunnel/stunnel.conf deb
client=yes
pid=/etc/stunnel/stunnel.pid
debug=7
foreground=no
verify=0
[aleoclient]
accept=13131 connect=aleo-asia-ssl.f2pool.com:4420 EOF
c. Start stunnel
View stunnel installation information by running:
whereis stunnel
Then get an output as this example:
stunnel: /usr/bin/stunnel /usr/lib/aarch64-linux-gnu/stunnel /etc/stunnel /usr/share/man/man8/stunnel.8.gz
Start stunnel by running:
sudo stunnel
View stunnel progress by running:
ps -ef|grep stunnel
Then get an output as this example:
root 6818 1449 0 15:15 ? 00:00:00 stunnel
Verify the local port by running:
telnet localhost 13131
Then get an output as this example:
Trying 127.0.0.1…
Connected to localhost.
Escape character is ‘^]’
2) Start the mining software
a. Set the account name:
Open the config.cfg file, find ACCOUNT_NAME=accountname, and replace the accountname with your f2pool account name.
b. Add pool URL:
In the config.cfg file, change the fifth line into POOL="127.0.0.1:13131"
If there are multiple machines connecting in your ethernet, it is not required to install stunnel on all other machines, you only need to replace xxx.xxx.xxx.xxx in POOL="xxx.xxx.xxx.xxx:xxxx" with your stunnel proxy address (the IP of the computer or server with stunnel installed) in the config.cfg file, and set default port as 13131.
For example, if the ethernet IP of the device installed with stunnel is 192.168.1.25, then replace the second line in your config.cfg with POOL="192.168.1.25:13131".
3) Run the software:
Copy the flies of aleo_setup.sh, aleo-prover-cuda and config.cfg into same folder on your mining machine.
At the first time of mining, run the following command to generate the scripts of start_aleo.sh and stop_aleo.sh:
sudo ./aleo_setup.sh
Check out if it is running properly using this command:
ps aux |grep aleo
In 3 minutes, the result will be successful if it shows similar as the following example.
2022-12-09 00:19:41.041 INFO 2.1.2 474322 perf: 870059 (1m: 1319.02 P/s, 5m: 1317.87 P/s, 30m: --- P/s, 60m: --- P/s)
2022-12-09 00:20:41.042 INFO 2.1.2 474322 perf: 949274 (1m: 1320.25 P/s, 5m: 1318.25 P/s, 30m: --- P/s, 60m: --- P/s)
2022-12-09 00:21:41.043 INFO 2.1.2 474322 perf: 1028496 (1m: 1320.37 P/s, 5m: 1319.03 P/s, 30m: --- P/s, 60m: --- P/s)
2022-12-09 00:22:41.044 INFO 2.1.2 474322 perf: 1107681 (1m: 1319.75 P/s, 5m: 1319.43 P/s, 30m: --- P/s, 60m: --- P/s)
Then you may run the following command to start mining. This will run automatically at startup from the next time.
./start_aleo.sh
To pause mining, run the following command:
./stop_aleo.sh
Your machines are now ready to mine! You can manage your account settings and monitor your hashrate, rewards and so on in your dashboard or in f2pool app.
Mine ALEO on HPOOL – Windows
- Update the GPU driver to the latest version.
- Cuda version 11.7 and later.
- System Environment: windows 10, 11 OpenSSL version: 1.1.1
- Required software: Hpool-Aleo-Miner, Hpool-Xproxy-aleo
The Hpool-AleoMiner-Windows version is less efficient than the Linux version and is still in the process of being optimized and updated.
Recommended Configuration:
- CPU: 4-cores/GPU
- GPU: 2080Ti/3080/3090
- Memory: 8G+ of memory per GPU, maximize memory channels as much as possible
- Note: Currently doed not support the NVIDIA Pascal architecture GPU.(such as GTX1060,1070,etc)
Please join Hpool Aleo community where you can communicate and answer questions: https://t.me/Hpool_Aleo_Global
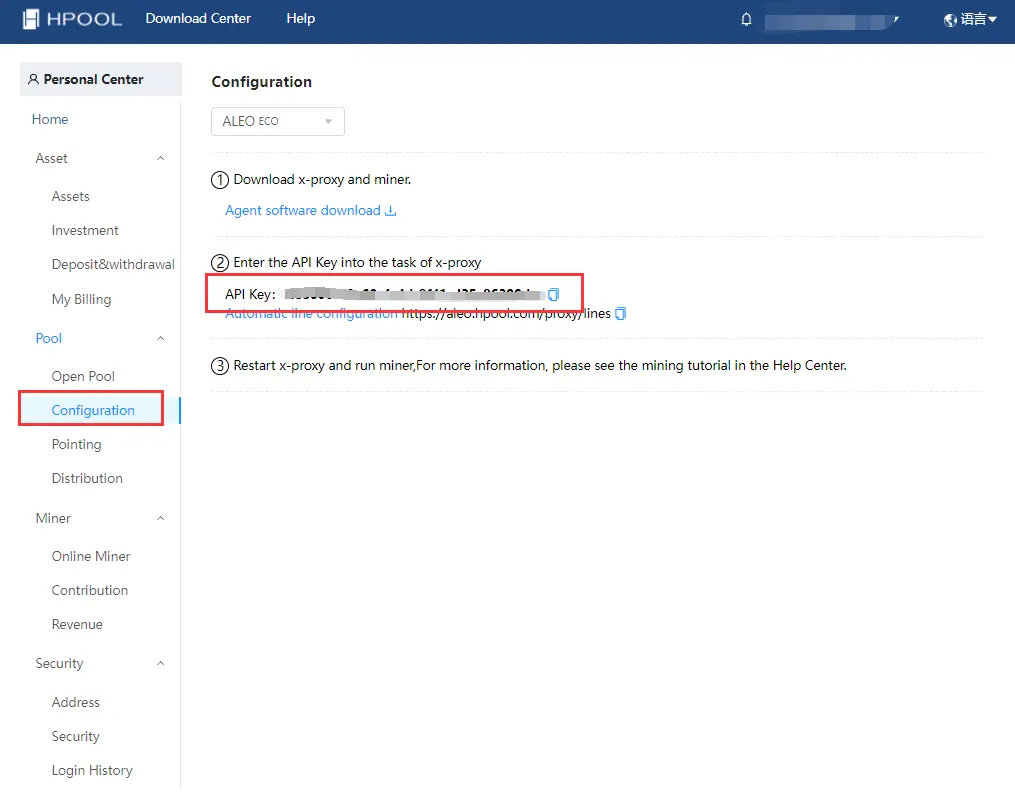
1. Login to Hpool, access the personal center – open pool page, click “All” to find “ALEO ECO” pool and open pool.

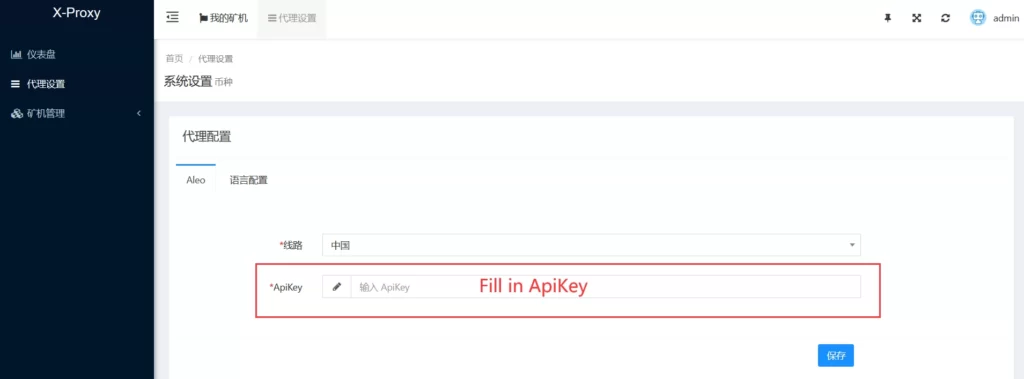
2. Get your ApiKey

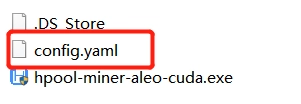
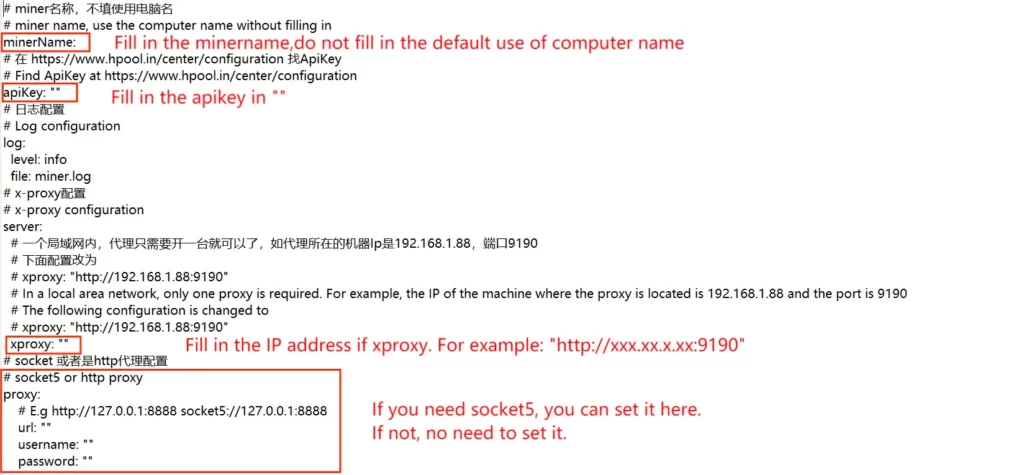
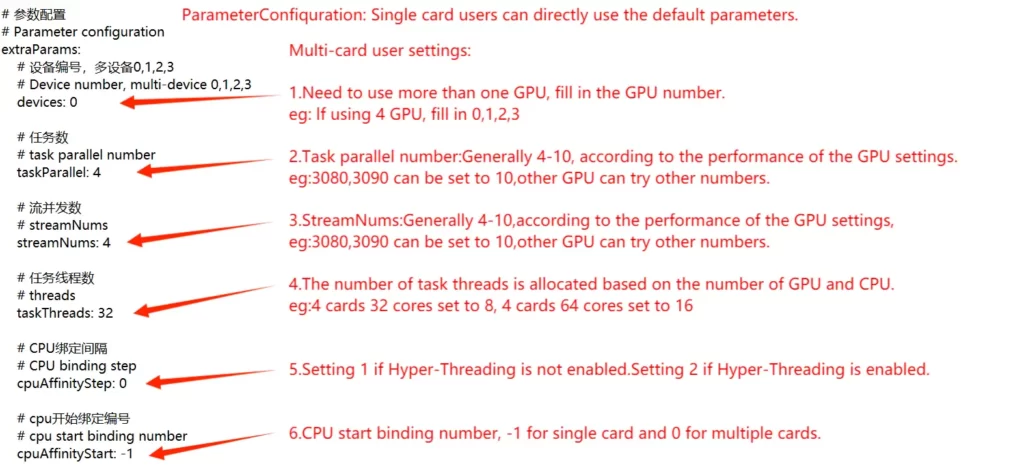
1. Open and set config
(Note: The parameter configuration will directly affect the efficiency, you can try a variety of parameter settings to find the best efficiency)
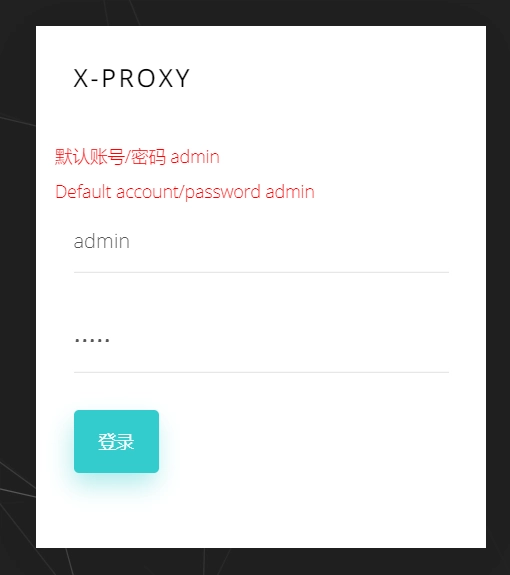
2. Login xproxy
Note: In a local area network, only one xproxy is required.Other devices can point to this machine from the address set in miner-config.

The default account and password: admin/admin
Fill in Apikey, click to save
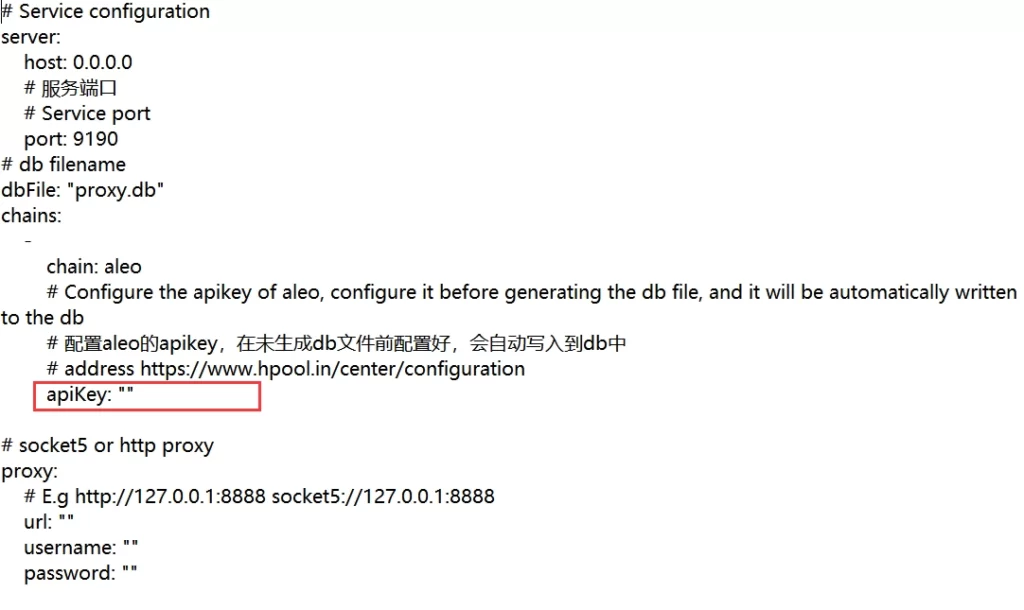
Open the config file and fill in your Apikey
Start mining by running Miner and xproxy at the same time.
Mine ALEO on HPOOL – Linux
- Update the GPU driver to the latest version.
- Cuda version 11.7 and later.
- System Environment: Ubuntu 1804, 2004, 2204(If the system version is too low, it will cause the library version of libc to be too low,causing miner to not run)OpenSSL version: 1.1.1
- Required software: Hpool-Aleo-Miner, Hpool-Xproxy-aleo
Recommended Configuration:
- CPU: 4-cores/GPU
- GPU: 2080Ti/3080/3090
- Memory: 8G+ of memory per GPU, maximize memory channels as much as possible
- Note: Currently doed not support the NVIDIA Pascal architecture GPU.(such as GTX1060,1070,etc)
Please join Hpool Aleo community where you can communicate and answer questions: https://t.me/Hpool_Aleo_Global
1. Login to Hpool, access the personal center – open pool page, click “All” to find “ALEO ECO” pool and open pool.

2. Get your ApiKey


1. Open and set config
(Note: The parameter configuration will directly affect the efficiency, you can try a variety of parameter settings to find the best efficiency)


2. Login xproxy
Note: In a local area network, only one xproxy is required.Other devices can point to this machine from the address set in miner-config.
Open the config file and fill in your Apikey

Start mining by running Miner and xproxy at the same time.
Mine on Aleopool – Pool Mode
Recommend Hardware
- CPU: 4 cores CPU
- GPU: 2080Ti/3080/3090*8
- RAM:8G/GPU
- SSD:128G
Need to install the latest graphics card driver, currently only support NVIDIA graphics cards
- Login Aleo Pool,and complete the registration;
- Go to “Dashboard” and click “Add Account” on the “Miners” page
- Record and save your mining account names
Latest update: 2022-12-05
1. Enter Directory of aleo-pool-prover
2. Running following codes
./aleo-pool-prover_ubuntu_1804_gpu --account_name test_account --miner_name test_miner
#Make sure the prover name as same as you downloaded one
#Replace "test_account" with your mining account name
#"test_miner" with a customizable one for web-based device differentiation.
3. If you need to adjust the resource usage, you can add after the command line
-j number of tasks (default is 1) -t number of threads for a single task4. If dual GPUs are used, each GPU starts a process and the GPU used for the current process is controlled by the CUDA_VISIBLE_DEVICES environment variable
export CUDA_VISIBLE_DEVICES=0
./aleo-pool-prover_ubuntu_1804_gpu --account_name test_account --miner_name test_miner
export CUDA_VISIBLE_DEVICES=1
./aleo-pool-prover_ubuntu_1804_gpu --account_name test_account --miner_name test_minerAfter configuration, the miners will be automatically added to your Aleo pool in about 1 minute, and the tested power speed can be viewed in real time in the device backend. You can also view it on the Aleo Pool webpage. The statistics on the web side is the average computing power of 15 minutes, so the data will be synchronized with the backend data after 15 minutes.

Mine ALEO on DamoMiner
The following steps 1 to 3 are for the ubuntu command line version. For the ubuntu desktop version, after install the file, you can start directly from step 4.
Note : It is recommended to use ubuntu 20.04 version; [ubuntu desktop version/command line version download address: https://releases.ubuntu.com/focal/]
Before running DamoMiner, please ensure that your mining machine has GPU driver installed.
Note: Driver version 470 or above is required, version 470.141.03 and 515.65.01 are recommended, version 520 and 525 are not recommended at present [3060M GPU requires specific driver version 465.31]
Use the command sudo apt-get install wget to install the wget tool.
Once you have wget tool installed, execute the command wget
https://github.com/damomine/aleominer/releases/download/v2.2.0/damominer_linux_v2.2.0.tar to download the Damominer file.
Note: If is file is downloaded too slow, you can use wget https://ghproxy.com/https://github.com/damomine/aleominer/releases/download/damominer_linux_v2.2.0/damominer_linux_v2.2.0.tar instead.
Use the command tar -xvf damominer_v2.2.0.tar to unzip the downloaded file, get the following files:

run_gpu.sh is the startup script of the GPU miner.
Execute the commands chmod +x damominer and chmod +x run_gpu.sh to add operation permission.
Execute the command vi run_gpu.sh,the script damo is as follows:

./damominer –address aleo1p6xnyqrz34l8khlwv2z27qne0yfar9f2yt7nkjxywvmmspc67szs50x9el –proxy asia1.damominer.hk:9090
Note: The options marked in red needs to be changed accordingly.
“–address”, specify your own wallet address.
“–proxy”, specify the IP address and port, check the official announcement for the latest IP address.
“–worker”, specify a custom miner name, example: –worker tester001 (optional, if not filled in,need to delete “–worker” , the default is the local network IP address)
Check out all your information input, put your mouse at the blank space below, press Esc , use the command : wq, save and exit, run the ./run_gpu.sh script to start mining.
Use the command tail -f aleo.log to check the log.
Once you have DamoMiner installed, you can view relevant mining data in about half an hour.
Conclusion: Choose a Pool to Mine ALEO
The Aleo mining pool in the market mainly includes f2pool, Hpool, ZK.work, Hamp, Zkrush, Aleopool, Damo, etc. You can choose F2pool, Hpool, Aleopool, or DamoMiner and follow the above tutorials to start mining Aleo. For other Aleo mining pool tutorials, please refer to the following links:
ALEO FAQs
What is Aleo
Aleo is a platform for private applications using zero-knowledge cryptography. The Aleo blockchain – based on a novel consensus protocol – is designed to be faster and more efficient than traditional models by leveraging zero-knowledge (ZK) proofs.
What Is a Zero-Knowledge Proof (ZKP)
An increasingly common way privacy is achieved on public blockchain networks is through Zero-Knowledge Proofs (ZKPs)—a method for one party to cryptographically prove to another that they possess knowledge about a piece of information without revealing the actual underlying information.
What Makes ALEO So Special?
Contrary to popular belief, the primary innovation of the Bitcoin protocol was not advanced cryptography, but its groundbreaking application of economic theory to distributed systems. The economic incentives it employed to align its “miners” in achieving consensus created an elegant, simple machinery for network security that no previous protocol had achieved. Similarly, Aleo’s tokenonomics is engineered to align incentives across all of the stakeholders in our system in as simple a way as possible in service of the Aleo network.


